For Christmas, my husband made me a journal out of an old book. He removed the pages of the book, cut new pages out of notepaper and used bookbinding glue to attach the new pages to the cover. Not only was it the best gift I’ve ever been given, it opened up an endless supply of craft ideas. Our first project is a Valentine Love Journal for each of the grandmas.

What Is In A Valentine Love Journal?
I wanted all of the kids to participate at their own levels and I wanted this to be a meaningful keepsake. I came up with some questions for the kids:
- If Grandma was here, what meal would you like to cook with her? For the older kids, this meant copying a recipe and maybe drawing a picture. For the younger kids, I helped with the copywork and they just colored. I found my recipe template at Domestifluff.
- If Grandma was here, what music would you like to share with her? I did this one particularly for my 10-year-old who has a favorite piano piece she wants to share, but the little ones shared songs, too. The older kids copied down sheet music and lyrics, while the younger ones told me a song and I wrote down the lyrics.
- If you could write a poem for Grandma, what would it say? This idea came from Doing Good Together’s 28 days of Kindness Challenge.
Then I added some coloring sheets and some blank pages for free expression. And of course, I had to make a photo collage.
We bound all of these sheets together and enclosed them in a cover from a children’s book. The following are step by step instructions. If this project is too big, don’t let the binding stop you. You can bind with staples or a three-ring binder or upload it all to a photobook site and order your copies. You could even just buy a blank journal for your kids to draw in. We started late, so I kept ours short. It would be a really nice gift to add to all year.
Supplies for a Valentine Love Journal
We have a couple links to our Amazon affiliate page*. Depending on how perfect you want this project to turn out, you can probably get by with cheap school glue and no special purchases. However, the specific suggestions are the tools the pros recommend.
- An old hard-cover picture book. One that is so awful that you don’t mind destroying it. Pro Tip: If you can find one with 8 1/2 x 11 pages, you can save yourself the cutting step.
- The pages for your journal. See the suggestions above and in Step #4 below.
- One sheet of paper twice the size of your other sheets. (i.e. If you are going with 8 1/2 x 11, this sheet would be 17 x 22). We were able to use the first and last sheet of the original book because it was one continuous sheet. If that doesn’t work, a sturdy sheet of wrapping paper or butcher paper may do the trick.
- X-ACTO Knife — If you want to be a perfectionist.
- Paper cutter or scissors (if you didn’t follow my pro-tip in #1).
- Mod Podge
 or other glue.
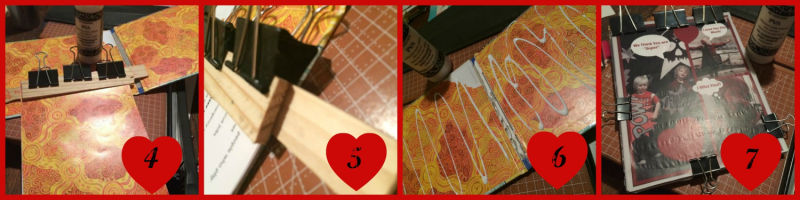
 - Binder clips or a vice. We also used some thin pieces of wood (see picture #5), but thick cardboard would work, too.
- Books by Hand pH Neutral PVA Adhesive or other glue for binding.
Instructions for Valentine Love Journal Binding
Here are the binding instructions. I added some affiliate links, but I’ve also offered alternatives:
Step 1: Rip out the pages of an old book. We just ripped them out to my husband’s horror. He recommends using an X-ACTO Knife. (Ripping worked just fine).
Step 2: Use the old pages to measure your new pages. You’ll want most of your sheets to be the size of one page. But your first and last page will be one folded sheet of paper the size of two pages. We just used the first and last page of the original book for this. They were already one continuous sheet.
We made the mistake of designing our pages before we cut them out. It’s better to cut them out first and then design. That way nothing will get cut off.
Step 3: Glue the new cover picture onto the book cover. I think Mod Podge![]() would be the best way to go here. Mine had mysteriously disappeared, so I used the bookbinding glue. It did the trick. School Glue could have worked, too.
would be the best way to go here. Mine had mysteriously disappeared, so I used the bookbinding glue. It did the trick. School Glue could have worked, too.
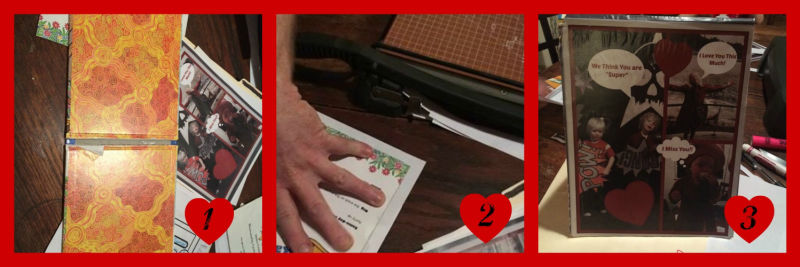
Step 4: Assemble the new pages. Besides the pre-printed pages I made, you could use art, stories or poetry that has been sent home from school. You can even toss some of the original book pages back in. We considered putting in a CD sleeve page so we could make a mix-tape, but decided maybe next time.
Step 5: Clip the pages together. We used large binder clips and paint stir sticks. Run a line of glue across the clipped pages and allow to dry to the touch. We used this glue: Books by Hand pH Neutral PVA Adhesive![]() . It is made specifically for book binding. My journal has held up really well. I would recommend this for anything that is going to get used a lot. However, I used to do something similar with Elmer’s school glue. If you think your Valentine Love Journal will be read once or twice and then set in a bookshelf, you could get away with the cheaper glue.
. It is made specifically for book binding. My journal has held up really well. I would recommend this for anything that is going to get used a lot. However, I used to do something similar with Elmer’s school glue. If you think your Valentine Love Journal will be read once or twice and then set in a bookshelf, you could get away with the cheaper glue.
Step 6: Wrap the double-sized sheet over the bound pages and glue it along the previous glue line. It will become the first and last pages of your book.
Step 7: Glue the first and last pages of your bound sheets to the inside of the cover. Clip it all together and let dry overnight.
Confused? This instructional YouTube video is how my husband learned how to make my Christmas present. The applications are endless.
Lessons Learned for our next Valentine Love Journal:
Although this is a time-consuming craft, I guarantee this is easy. The hardest part was getting my kids to do their part. Next time I will get an 8 1/2 x 11 book and just use homework and art they have already made.
 *The product links in this article are affiliate links. We receive a small portion of sales.